
Pillowing is a common problem in 3D printing that affects the top surface of a printed object. It occurs when the top layers of a print appear bumpy or have small holes, resembling a pillow-like texture.
This issue can negatively impact the appearance and quality of your 3D prints. Understanding the causes of pillowing and learning how to fix it can help you achieve smooth and high-quality prints.
What Causes Pillowing?
- Insufficient Top Layers: One of the main reasons for pillowing is having too few top layers in your print settings. If the top layers are not thick enough, they may not fully cover the infill pattern below them, leading to visible bumps or holes. The infill structure supports the top layers, and when there are not enough layers, the top surface may sag into the gaps of the infill, causing pillowing.
- Low Extruder Temperature: If the extruder temperature is too low, the filament may not melt properly, leading to poor layer adhesion. This can cause gaps or holes in the top layers as the filament does not bond well with the previous layers. Inadequate adhesion can also result in an uneven surface, contributing to the pillowing effect.
- Incorrect Cooling Settings: Cooling is crucial for the proper solidification of the filament. If the cooling fan is set too high, the filament may cool too quickly it can lead to improper bonding between the layers. On the other hand, if there is insufficient cooling, the filament may stay too soft and not form a smooth surface, causing pillowing.
- Low Infill Density: A low infill density can cause the top layers to sag into the gaps between the infill lines. When the infill is too sparse, it does not provide enough support for the top layers, leading to a bumpy surface or small holes.
- Poor Quality Filament: Using low-quality filament can result in inconsistent extrusion, leading to weak spots in the top layers. Poor-quality filament may also contain impurities that cause blockages or uneven melting, contributing to the pillowing effect.
How to Fix Pillowing in 3D Printing?
Try this technique below to fix pillowing, most of the times doing this will solve the pillowing –
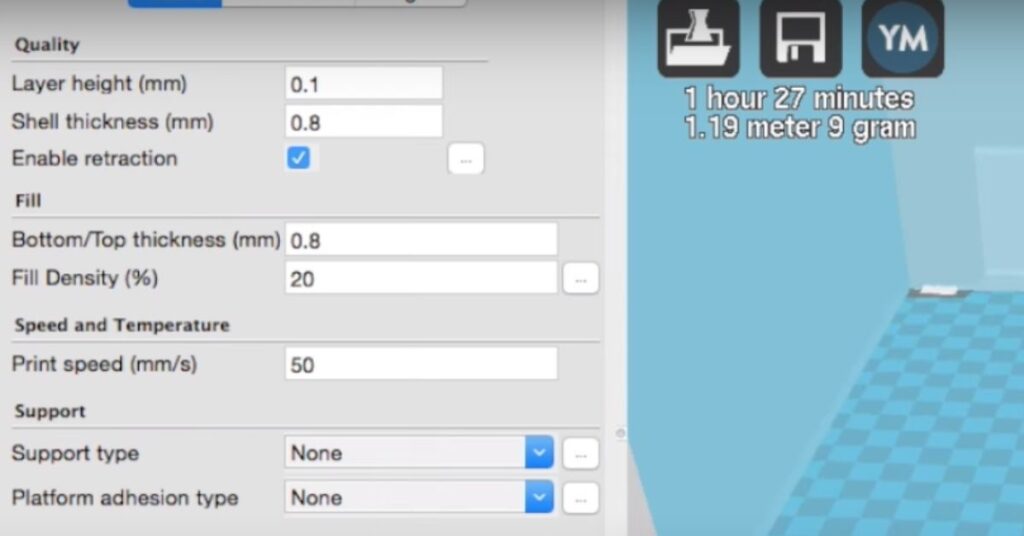
Always have a decent amount of top/bottom layers (4 or more) to avoid pillowing and other defects. The infill density also has to be enough to support the top layers. The density that I feel alteast has to be given to have a nice looking print is 20%. You can always try lower or higher infill densities but in my experience going lower then this will give problems most of the time.

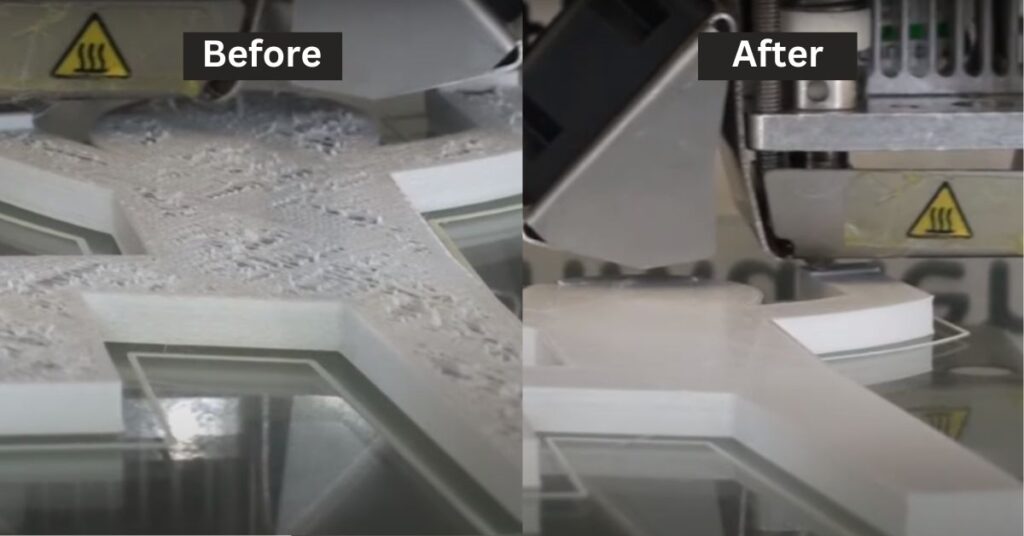
In the picture below you can see the difference in prints and pillowing is completely fixed. In the before pic, the infill density is 5% and bottom/top thickness is 0.2 mm. So the infill density was quite low as well as only 1 the top layer is used as a result of which there was not enough infill to support the top layer properly.
After changing the infill density to 20% and the top thickness to 0.8mm. You can see in the after image the error is completely vanished.
- Increase the Number of Top Layers: A simple and effective solution to prevent pillowing is to increase the number of top layers in your slicer settings. As a general rule, aim for at least 6 to 8 top layers to ensure a smooth and even surface. This will provide better coverage and support, preventing the infill pattern from showing through.
- Adjust Extruder Temperature: Make sure your extruder temperature is set correctly for the type of filament you are using. If the temperature is too low, try increasing it slightly to ensure proper filament melting and adhesion. Check the filament manufacturer’s guidelines for the optimal temperature range.
- Optimize Cooling Settings: Adjust the cooling fan speed in your slicer settings. If the cooling fan is running too fast, reduce the speed to allow the filament to bond properly. On the other hand, if you notice that the filament is staying too soft, increase the fan speed slightly to improve solidification.
- Increase Infill Density: Increasing the infill density can provide better support for the top layers, reducing the chances of pillowing. Try using an infill density of at least 15-20% to ensure the top layers have a solid foundation.
- Use High-Quality Filament: Invest in high-quality filament from a reputable manufacturer. Good branded filaments have consistent diameters and fewer impurities, ensuring smooth extrusion and reducing the risk of pillowing.
Conclusion
Pillowing can be a frustrating issue, but with the right settings and maintenance, you can achieve smooth, high-quality prints. By increasing the number of top layers, adjusting extruder temperature, optimizing cooling settings, increasing infill density, and using high-quality filament, you can prevent pillowing and improve your overall print quality.
Regularly checking and fine-tuning your 3d printer settings will help you avoid common printing problems and produce better results.
Happy printing!
Defects in FDM 3D Printing

