

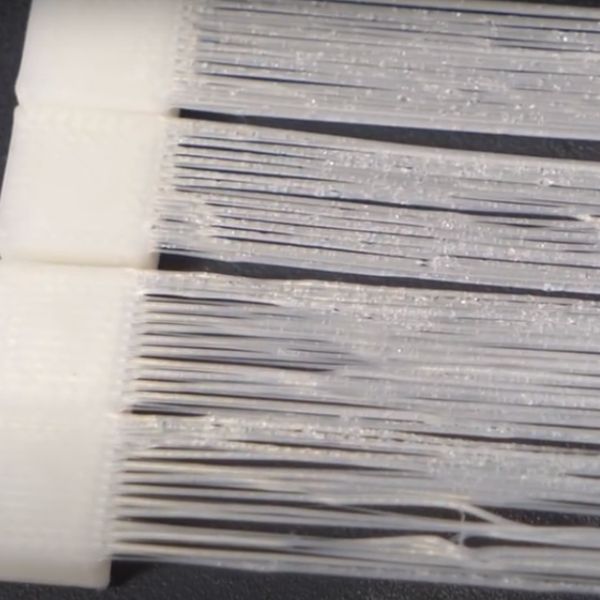
Bridging is a term used in 3d printing to describe the process of printing material over open spaces between two points without any support underneath. Think of it like building a small bridge across a gap.
While this technique is often necessary in 3d printing. Sometimes printing bridges can be tricky land can have poblems often known as bridging issues. These issues can cause the printed material to sag, droop, or have a rough finish.

Let’s explore what causes bridging issues and how you can fix them to improve your 3d prints.
What Causes Bridging Issues?
- Incorrect Print Speed: The speed at which your printer moves while printing the bridge is important. If the print speed is too high then the filament may not have enough time to cool and solidify properly. This can cause the filament to sag or droop.
- Improper Cooling: Cooling also plays a vital role in bridging. If the cooling fan is not set correctly or it is not doing enough cooling, the filament may stay too hot and not solidify quickly enough when printed over open spaces. This can also lead to sagging of the bridge.
- Poor Extrusion Settings: The amount of filament extruded during bridging affects the quality of the print. If too much filament is extruded, it can cause the bridge issues. On the other hand if too little filament is extruded, it can result in gaps or weak spots in the bridge.
- Long Bridge Lengths: The longer the bridge, the more likely it is to have issues. Longer bridges are more difficult to print without sagging because the filament has to span a larger gap without support.
- Low-Quality Filament: Using a low quality filament can also contribute to bridging issues. Inconsistent filament quality can lead to uneven extrusion, which makes it harder for the printer to create a clean, smooth bridge.
How to Fix Bridging Issues in 3D Printing?
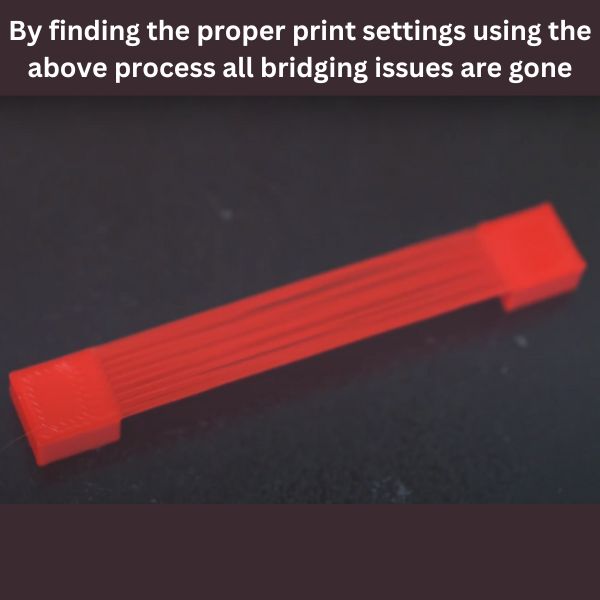
The best practise to fix bridging issues for all time is to find out the best settings for printing a particular filament by testing it for bridges. Once you have done this your print will defenitly have better prints and no bridging issues.
Follow this simple process below to find the best printing setting for your filament and yes ideally you should do this for every different filament.
You have to test for 3 most important settings for proper brigding – print setting, cooling fan speed and flow rate.
Test Piece: The test piece is quite simple, it have 5mm blocks on each side with bridge going from one block to other. You can also make it with any 3d modelling software if you want or simply download this test piece from thingiverse –> Test Piece.
Finding the best print speed: Test this test piece with various print speeds like 15mm/s, 20mm/s, 25mm/s, 30mm/s, 35mm/s, 40mm/s, 45mm/s etc. You can test for more print speeds here I have given these speeds for example. Ideal print speed for bridging can be different for different printers even if they are the exaclty same models.
Now observe and check each test piece printed with different speed, for which print speed you got the best print results. Now use this speed whenever you want to print bridges.
Finding the best fan speed: Secondly, just like the first test, now use the different fan speeds and print several test pieces and check with what fan speed you are getting the best print results.
Finding the best flow rate: Lastly, test with different flow rate for example – 100%, 110%, 120%, 130%, 140%, 150% etc. Use the best print speed and best fan speed from last tests.
Observe the each test piece printed with these different flow rates for best quality print. Combine these three best settings to get proper bridges and remove all bridging issues.
It may take 1 to 2 days to do these tests but it will definitely increase the printing quality of your printer. You can do this for every filament for better results.
I got the best flow rate for bridging at 130% but as I told you earlier, it can be different for each printer.
Check my article on other defects in fdm 3d printing here —> Common Defects in 3D Printing.
Individually correcting these factors below will fix bridging problems but the best thing is to follow the process I explained above. I am briefly explaining each so that you can understand there effect:
- Reduce Print Speed: Lowering the print speed for bridges can help improve print quality. Slowing the speed will give filament more time to cool and solidify, reducing the chance of sagging and other issues. Most slicer software allows you to set different speeds for bridges, so try reducing the speed to see if it helps.
- Improve Cooling: Ensure that your cooling fan is set correctly to provide adequate airflow to cool the filament as it prints over open spaces. Increasing the fan speed can help the filament solidify faster and maintain a flat bridge. Be careful not to set the fan speed too high, as this can cause other printing issues.
- Adjust Extrusion Settings: Fine tuning your extrusion settings can also help reduce bridging problems. Try lowering the extrusion multiplier or flow rate slightly to prevent excess filament from being extruded during bridging. This can help achieve a smoother and more stable bridge. In some cases i can be vise versa too. So the best thing to do is to find the best extrusion settings for your filament by following the method I have discussed earlier.
- Shorten Bridge Lengths: Try to design your 3D models with shorter bridges. Reducing the length of bridges can make them easier to print without sagging. If a long bridge is unavoidable, consider adding support structures underneath to provide extra stability.
- Use High-Quality Filament: Always use high quality filament from a trusted manufacturer. High-quality filaments have consistent diameters and fewer impurities, ensuring smooth and even extrusion. This can help reduce bridging issues and improve overall print quality.
- Increase Bridging Flow Rate: Slicer software allows you to adjust the flow rate specifically for bridging. Increasing the flow rate slightly for bridges can help ensure that the filament is properly extruded and maintains a stable structure across the gap.
Conclusion
Bridging issues can be challenging, but with the right settings and adjustments, you can achieve better print quality.
By reducing print speed, improving cooling, adjusting extrusion settings, shortening bridge lengths, using high-quality filament, and optimizing bridging flow rates, you can minimize bridging problems and produce smoother, more precise 3d prints.
Regularly checking and fine-tuning your printer settings will help you avoid common printing issues and create high-quality prints every time.
Happy Printing!
Defects in FDM 3D Printing

